Step-by-step guide

How to start a mess with Messtro

Follow these 12 steps to go from nothing to a mess that runs itself: meals counted, bazar and bills split, and everyone's balance settled at month end. Keep the app open beside this page and tick off each step as you go.

  • About 10 minutes to set up
  • An Android phone with Messtro
  • Your members' email addresses, if you have them
0 of 12 steps done

Part 1

Get started

Sign in and create your mess. Whoever creates it becomes its manager.

  1. Step 1

    Install Messtro and sign in

    Get Messtro from Google Play and open it. Sign in with Continue with Google, or use Continue with email to create an account with your email and a password.

    • Tick I accept, and agree to the Terms and Privacy before you continue.
    • Every member signs in on their own phone with their own account. You never need anyone's password.

    Tip: Sign in with an email you'll keep. It's how a manager recognises you when you join a mess.
  2. Step 2

    Create your mess

    On the welcome screen, tap Create a mess, fill in four details, then tap Create mess.

    • Mess name: at least 3 characters, such as your building or area.
    • Starting month: the month your accounts open. Usually the current month; choose next month if you're starting mid-month and want a clean start.
    • Country and Preferred currency: the currency fills in from the country, and you can change it.

    Tip: You become the mess manager. You can hand the role to someone else later from More.

Part 2

The setup wizard

Right after you create the mess, Messtro walks you through four quick steps. Only the first is required. Skip the rest if you like: you can change all of it later under More → Mess Configuration.

  1. Step 3

    Set your meal system

    Tell Messtro which meals your mess serves and how many meals each one counts as. The default is breakfast, lunch and dinner, each counting as 1.

    • Make a light breakfast count as 0.5, or a heavier lunch as 2, whatever your mess agrees on.
    • This only sets the default step when you record meals. The food cost is always split by the meals actually recorded.
    • Tap Save meal system to continue. This is the one wizard step you can’t skip.

    Tip: Not sure yet? Keep the default. You can change it any time under More → Mess Configuration.

  2. Step 4

    Add your members

    Tap Add member for each person in the mess. Enter their Full name and Email (required); Phone is optional.

    • When that person later signs in with the same email and joins, they're let in straight away, with no approval needed, and everything you recorded for them stays theirs.
    • Don't have someone's email yet? Leave them out; they can join with the invite code and you approve them.
    • Tap Skip if you'd rather invite everyone later.

    Tip: Adding members now lets you record their meals and deposits from day one, even before they install the app.

  3. Step 5

    Set up your bills

    Add the shared bills your mess pays: rent, internet, electricity, gas, the cook's salary. Tap Add bill and set:

    • Bill name and How often it's due: Monthly, Every 3 months, Yearly or One-off.
    • Amount type: Fixed amount for the same figure every month (rent, internet), or Varies each month for metered bills like electricity.
    • Who shares this bill? (everyone, or only specific members) and How do they split it? (evenly, or custom amounts).

    Tip: Setting up a bill charges nobody. Members are charged only when you record a payment for it, in the month it's paid.

  4. Step 6

    Record opening deposits

    If members have already handed you cash for the mess fund, record it here so the fund starts at the right balance. Choose the member, enter the amount, and tap Finish.

    • Record only cash you've actually received. Later deposits get added as they come in.
    • Nothing collected yet? Tap Skip. Either way the wizard ends and your mess's Home screen opens.

Part 3

Bring everyone in

Members join on their own phones with your mess's invite code.

  1. Step 7

    Share your invite code

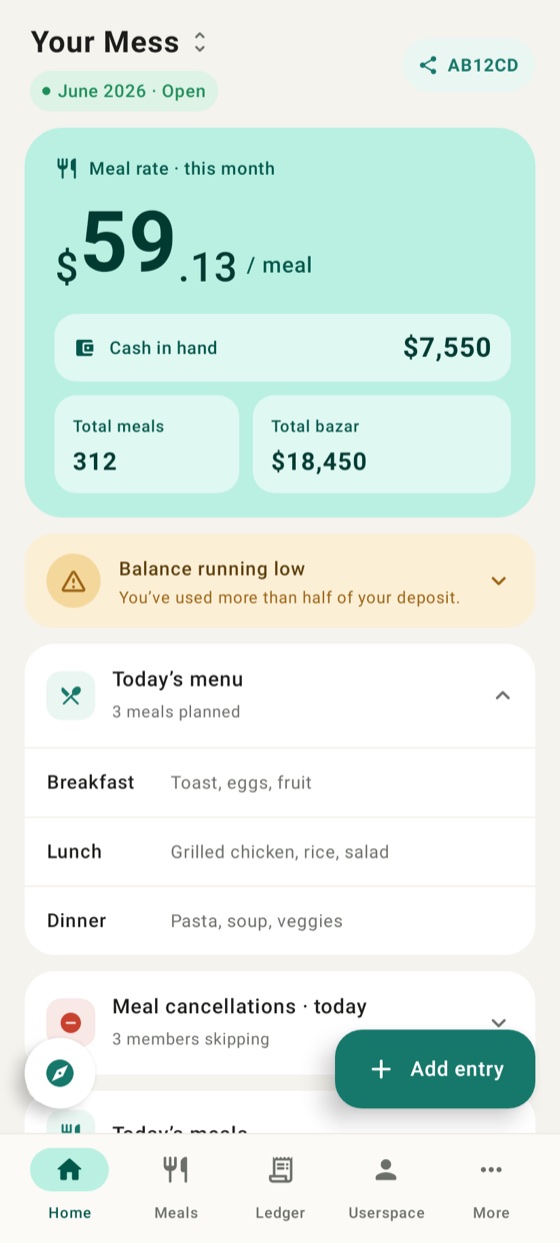
    Your mess's 6-character invite code sits next to the mess name at the top of Home. Tap it to share the code and an invite link over Messenger, WhatsApp or SMS.

    • Opening the link takes a member to the app, or to Google Play if they don't have it yet.
    • Or they open Messtro, tap Join a mess and type the code.
    • Any member can share the code. Who actually gets in is still up to you.
    The Home screen, with the mess name and its invite code at the top.
  2. Step 8

    Approve join requests

    Anyone you added by email gets in the moment they join. Everyone else sends a join request that waits for you.

    • Open Approvals from Home. The bell shows how many requests are waiting.
    • Approve to add the person to the mess, or decline. Someone who is declined can try a different code.

Part 4

Run your first month

Day to day, you record what happens and Messtro does the maths. At month end, you close the month and balances carry forward on their own.

  1. Step 9

    Record meals every day

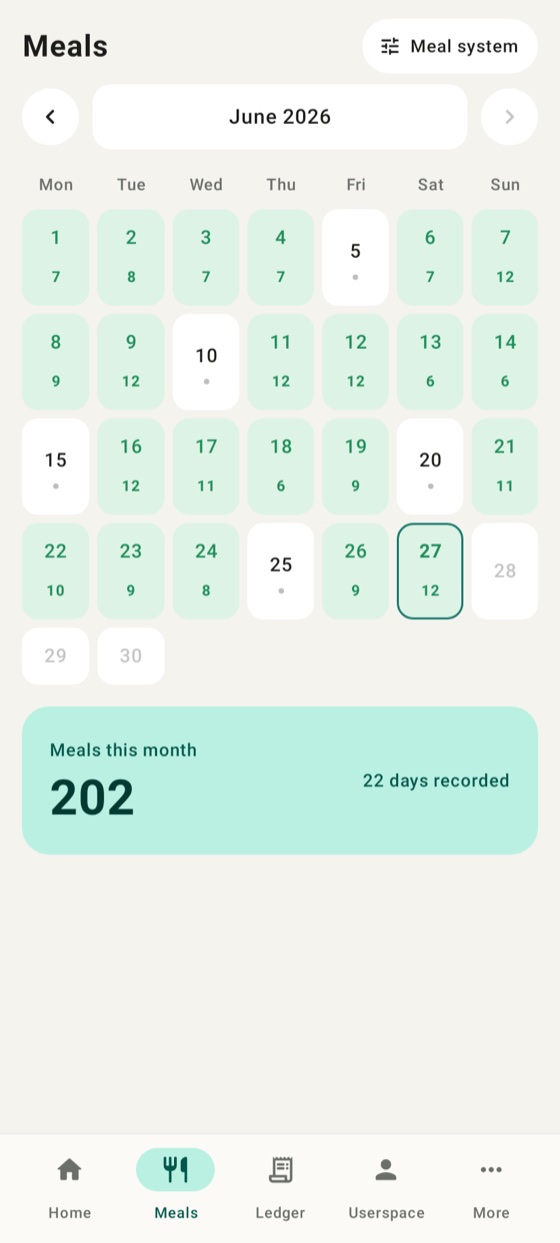
    Open Meals, or tap Add entry → Record meals, and tap in each member's meals for the day. Guests and half-meals count too.

    • Record daily. It keeps the month's meal count and meal rate accurate.
    • Meals someone will miss can be cancelled in advance with Cancel meals, so they aren't charged and the cook knows.
    • Use Guest meals when a member brings a guest; those meals are charged to that member.

    Tip: The meal rate is simple: total bazar ÷ total meals this month. Each member pays for their meals at that rate.

    The Meals calendar, where each day's breakfast, lunch and dinner are recorded.
  2. Step 10

    Record bazar and deposits

    Every grocery run goes in as bazar, so it counts toward the meal rate. Tap Add entry → Add bazar, enter the total (and the items, if you like) and who paid.

    • If a member paid from their own pocket, choose them as the payer. They're credited back and still pay only their share.
    • When a member hands you cash for the fund, tap Add entry → Deposit. Only the manager records deposits.
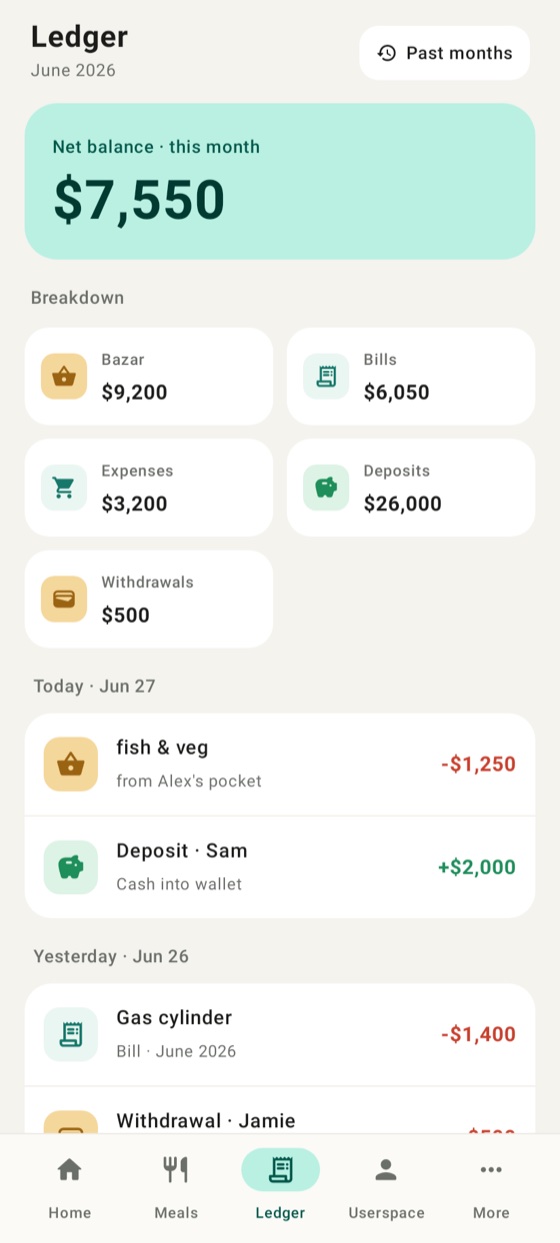
    • Everything lands in the Ledger with a running balance.
    The Ledger, listing bazar, bills and deposits with a running balance for the month.
  3. Step 11

    Pay bills as they come

    When you pay a bill, tap Add entry → Record bill payment, choose the bill and confirm the amount. A fixed bill fills its amount in for you.

    • The payment is split among the members who share that bill, in the month you pay it.
    • If a member fronted the money, record them as the one who paid. They’re credited back.
    • Home shows which bills are still due this month.
  4. Step 12

    Close the month

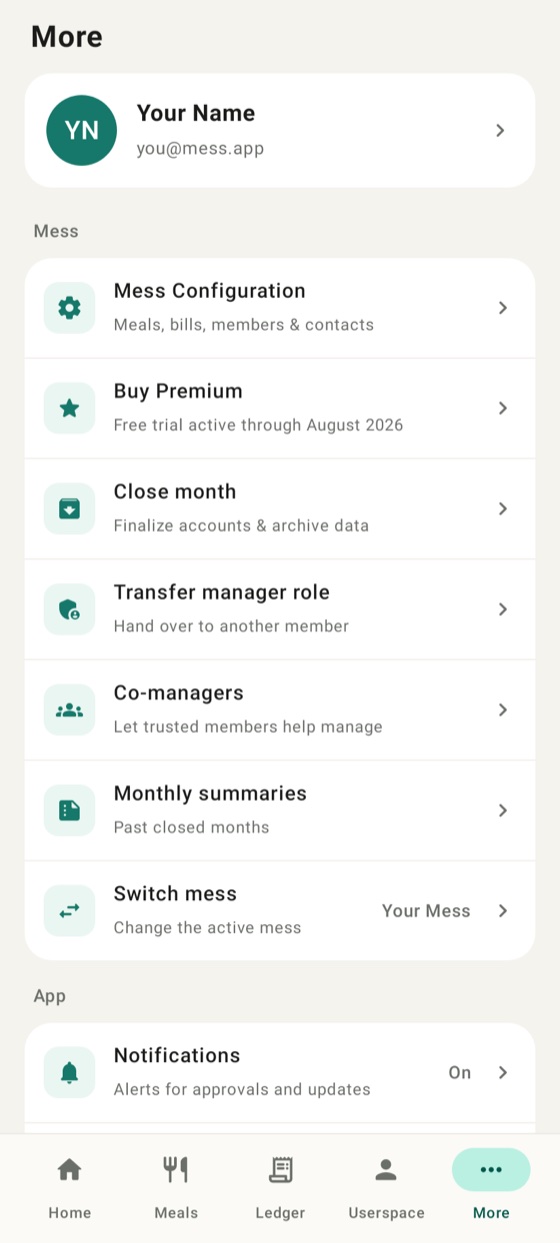
    At month end, go to More → Close month. You'll see a preview of every member's final balance before anything is locked.

    • Closing saves a permanent record under More → Monthly summaries.
    • Whatever each member is owed or owes carries into the new month as a Brought forward line, so nobody settles up by hand.
    • The next month opens straight away. Spotted a mistake? You can reopen the last closed month from More.
    • Only the mess's main manager can close or reopen a month.
    The More menu, with members, close month, monthly summaries and settings.

You're all set

Your mess now runs month to month: record, check balances, close, repeat. Stuck on something? Read the FAQ or contact us

Get it on Google Play
enbn